Well, it turns out there's been a nasty bug on the site for a while, which means leaving comments, or replies to comments hasn't been working for many users (me included). It's beyond me ... it used to work, but I think I've sussed it now (or at least a work-a-round), thanks to http://makingamark.blogspot.co.uk/2012/09/do-you-have-problem-leaving-comments-on-Blogger-blogs.html.
It seems this problem has been around a long while. Fix it please google....
Until that happens, please enjoy the full-frame work-a-round.
Thursday 26 November 2015
Saturday 14 November 2015
Arduino 1.6 IDE issues.
Just downloaded Arduino 1.6 to find some of libraries, notably TIME don't compile properly, and throw errors. I used the library manager to update them, and it's still bad.
The trick here is to delete the offending library from your ..../arduino/libraries directory and re-load it using the library manager.
Hopefully this will stop any further issues...
The trick here is to delete the offending library from your ..../arduino/libraries directory and re-load it using the library manager.
Hopefully this will stop any further issues...
Sunday 1 November 2015
A tale of two Bush TV22's.
Now, a few years back, I restored a 1951 Bush TV22 for my friend Colin.

I made a video at the time...
The Bush TV22 is a very common set, even now. They seem to crop up at regular intervals on eBay. It's a 9" TRF set, and had various modifications and different designs during it's long production run.
Now this set was used regularly until last year, when Colin rang to say it was acting up a bit, and could I take a look... sure.
And so it arrived. Poor line linearity and decreasing width as the set warmed up, over a period of 30 mins or so. Not good symptoms for a vintage television, as it's usually signs that the line output transformer is on it's way out, and good secondhand transformers are difficult to find, and new ones unobtainable.
That proved to be the cause with this set. Thankfully the Bush transformer is quite simple, and there's a marvelous chap called Ed, who can rewind the things. It's unusual to find a duff high voltage EHT winding in the Bush set, which is a blessing, as rewinding this part is not possible, So it's the primary and lower voltage secondaries that fail. Off to Ed it goes....
... Within a few days it returns, nicely rewound, and I reinstall it into the set .... the line stage warms up, and whistles strongly (a good sign). There's no glow from the EHT rectifier valve, and no EHT. I check the line stage from one end to the other. Nothing amiss... ???
I remove the transformer again, and perform a "ring" test. This is a basic test to ensure the transformer has no shorted turns. If it was the overwind, there's a few options open to me to create some EHT to drive the final anode of the CRT without using the overwind.
The ring test involves connecting the transformer to the square wave calibrator on your oscilloscope, at the end which is usually fed from the anode of the line output valve, and connecting the scope probe to the eht wiinding.
The ring test allows the transformer to oscillate. The more oscillations, the better the transformer.
 That all looks great...

A duff transformer looks like this.. See the "ringing" stops well before the next cycle...
A few emails swap between myself and Ed. It appears the transformer for this set was very unusual in it's construction, and one Ed had seen before. Some of the windings appeared to have been wound "out of phase" with usual convention. Could this be the cause of the issue? I experimented by removing the EHT overwind, and slotting it back onto the transformer upside down. It worked after a fashion, but the EHT was still very low. Ed asked me to return the transformer to him for further investigation.
 A few days elapsed, and the second rewind arrived back. Whilst the transformer was now functioning, the EHT was still low at around 4KV (it should be ~7.5KV), and there was terrible line fold-over which I couldn't get rid of...
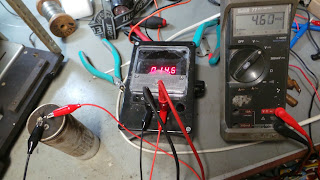
 To take the above picture, I needed more than the available 4KV, so I had previously purchased this little device from eBay...
Described as a DC 3V to 7KV 7000V Boost Step-up Power Module High-voltage Converter Generator, a useful addition to the armory of test gear. I wouldn't recommend shorting it out like the picture! Anyway, this provided some EHT to show the picture above.
 Then lady luck smiled on me... and this set arrived as a gift. Apparently found on a tip! There's a small crack to the bakelite case, but it's almost invisible. I don't actually own one of these sets, so it was most welcome.
 Naked, and filthy!
 Line output stage cover removed ... and dusty!
 First things first, and hook up the Leader CRT-910A tube analyser to see if it's worth pursuing. If the CRT is bad, it won't be worth doing anything with.
 The needle slowly swings into action ... and rises.... and rises ... 95%! I find this hard to believe, perhaps the analyser has developed a fault.... but checks on another tube show it's telling the truth!
So, I hatch a plan. Do a quick restore on the gifted set, in an attempt to prove the line output transformer. If it's OK, swap the transformer over to prove that the rewound transformer still has issues, or not, as the case may be ....
 Now this model was later, and has a different receiver (or RF deck) than the one we are repairing, which is a pity, as I was just hoping to fix the top chassis, which contains the power supply, line and frame stages, and just swap out the working receiver from Colin's set... not to be.

So, our tube (CRT) is good, so first, remove the mains smoothing capacitor, and give it a few hours on the ole' Dreadnaught capacitor reformer...
 It takes a while, but comes up well...
 Next up is to re-cap the frame stage. This is located on tag-strip on one side of the chassis. It's essential to do this before applying power, to avoid damaging the frame blocking oscillator transformer (Ed rewinds these too!)

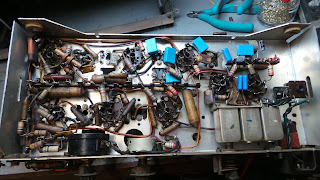
Then to re-cap the underside of the main chassis. Anything with wax insulation will be faulty (if not now, within hours of first use) and electrically leaky, so they are evicted on sight. There are two located under the tag-strip, which needs careful removal.


Whilst I'm doing this, I notice the line output transformer is different in appearance to the original in Colin's set. Thankfully this is simply a later revision, and the two are electrically identical.

A nicely dated capacitor shows the set was made late 1952.
 Tag-strip with line output components re-capped. (There's one on the sound transformer to change yet! Can you spot it?)
 Then onto the receiver or RF deck...
Half-way there!
 And, once finished, on with some mains!


EHT rises, and eventually settles on ~8KV
And, after some alignment issues with the front end of the RF Deck... pictures :)
Pictures were taken in a mirror...


 The set isn't finished by a long-way, as there's much rubber insulated wiring that has degraded and become brittle, but it's proved a point.

 So the known good transformer is removed from the set, and an adaptor bracket is made, so we can mount it into Colin's set, as the two transformers are cosmetically different.

And Colin's set produces a good picture!
I check the resistances on all the windings, and between the windings on both transformers. They are identical... I measure the inductances on all the windings, both transformers measure the same. I have another word with Ed, and he asks me to send him both the known good transformer and the re-wound one. Ed finds the only difference between the transformers is the inter-winding capacitance. After a few test windings, Ed succeeds in making two transformers that measure identically.... and, sure enough I fit the freshly re-wound transformer back into Colin's set, and, with bated breath, switch on!
 Results!
 Back in it's cabinet, and undergoing a soak test for a few hours!
Big thanks to Ed for his incredible diagnostic and re-winding skills, and thanks to Colin, for donating this lovely 20" Sony Widescreen..


I made a video at the time...
The Bush TV22 is a very common set, even now. They seem to crop up at regular intervals on eBay. It's a 9" TRF set, and had various modifications and different designs during it's long production run.
Now this set was used regularly until last year, when Colin rang to say it was acting up a bit, and could I take a look... sure.
And so it arrived. Poor line linearity and decreasing width as the set warmed up, over a period of 30 mins or so. Not good symptoms for a vintage television, as it's usually signs that the line output transformer is on it's way out, and good secondhand transformers are difficult to find, and new ones unobtainable.
That proved to be the cause with this set. Thankfully the Bush transformer is quite simple, and there's a marvelous chap called Ed, who can rewind the things. It's unusual to find a duff high voltage EHT winding in the Bush set, which is a blessing, as rewinding this part is not possible, So it's the primary and lower voltage secondaries that fail. Off to Ed it goes....
... Within a few days it returns, nicely rewound, and I reinstall it into the set .... the line stage warms up, and whistles strongly (a good sign). There's no glow from the EHT rectifier valve, and no EHT. I check the line stage from one end to the other. Nothing amiss... ???
I remove the transformer again, and perform a "ring" test. This is a basic test to ensure the transformer has no shorted turns. If it was the overwind, there's a few options open to me to create some EHT to drive the final anode of the CRT without using the overwind.
The ring test involves connecting the transformer to the square wave calibrator on your oscilloscope, at the end which is usually fed from the anode of the line output valve, and connecting the scope probe to the eht wiinding.
The ring test allows the transformer to oscillate. The more oscillations, the better the transformer.
 That all looks great...
A duff transformer looks like this.. See the "ringing" stops well before the next cycle...
A few emails swap between myself and Ed. It appears the transformer for this set was very unusual in it's construction, and one Ed had seen before. Some of the windings appeared to have been wound "out of phase" with usual convention. Could this be the cause of the issue? I experimented by removing the EHT overwind, and slotting it back onto the transformer upside down. It worked after a fashion, but the EHT was still very low. Ed asked me to return the transformer to him for further investigation.

 To take the above picture, I needed more than the available 4KV, so I had previously purchased this little device from eBay...
Described as a DC 3V to 7KV 7000V Boost Step-up Power Module High-voltage Converter Generator, a useful addition to the armory of test gear. I wouldn't recommend shorting it out like the picture! Anyway, this provided some EHT to show the picture above.
 Then lady luck smiled on me... and this set arrived as a gift. Apparently found on a tip! There's a small crack to the bakelite case, but it's almost invisible. I don't actually own one of these sets, so it was most welcome.


So, I hatch a plan. Do a quick restore on the gifted set, in an attempt to prove the line output transformer. If it's OK, swap the transformer over to prove that the rewound transformer still has issues, or not, as the case may be ....
 Now this model was later, and has a different receiver (or RF deck) than the one we are repairing, which is a pity, as I was just hoping to fix the top chassis, which contains the power supply, line and frame stages, and just swap out the working receiver from Colin's set... not to be.
So, our tube (CRT) is good, so first, remove the mains smoothing capacitor, and give it a few hours on the ole' Dreadnaught capacitor reformer...

 Next up is to re-cap the frame stage. This is located on tag-strip on one side of the chassis. It's essential to do this before applying power, to avoid damaging the frame blocking oscillator transformer (Ed rewinds these too!)
Then to re-cap the underside of the main chassis. Anything with wax insulation will be faulty (if not now, within hours of first use) and electrically leaky, so they are evicted on sight. There are two located under the tag-strip, which needs careful removal.


Whilst I'm doing this, I notice the line output transformer is different in appearance to the original in Colin's set. Thankfully this is simply a later revision, and the two are electrically identical.

A nicely dated capacitor shows the set was made late 1952.
 Tag-strip with line output components re-capped. (There's one on the sound transformer to change yet! Can you spot it?)
 Then onto the receiver or RF deck...
Half-way there!
 And, once finished, on with some mains!

EHT rises, and eventually settles on ~8KV
Pictures were taken in a mirror...


 The set isn't finished by a long-way, as there's much rubber insulated wiring that has degraded and become brittle, but it's proved a point.
 So the known good transformer is removed from the set, and an adaptor bracket is made, so we can mount it into Colin's set, as the two transformers are cosmetically different.
And Colin's set produces a good picture!
I check the resistances on all the windings, and between the windings on both transformers. They are identical... I measure the inductances on all the windings, both transformers measure the same. I have another word with Ed, and he asks me to send him both the known good transformer and the re-wound one. Ed finds the only difference between the transformers is the inter-winding capacitance. After a few test windings, Ed succeeds in making two transformers that measure identically.... and, sure enough I fit the freshly re-wound transformer back into Colin's set, and, with bated breath, switch on!
 Results!
Big thanks to Ed for his incredible diagnostic and re-winding skills, and thanks to Colin, for donating this lovely 20" Sony Widescreen..

Apparently there's a 16" too ... that would be nice ;)
Subscribe to:
Posts (Atom)